Photobucket

Saturday, April 28, 2012

Guitar Frames


One day while browsing at Michael's Craft Store, I ran across these unfinished wooden guitar frames!!  When I saw them I knew exactly who I needed to make them for...  my daughter's cousins...  Chamber and Chilton.  Their mom and dad have several guitars hanging in their house and both of the boys also had their newborn pics taken with some of their dad's guitars. 
So, first thing was to get Andrea to send me pics of their play room so I could get the right colors. (I should mention that Andrea also has a blog...  Buttons Bowties and Bubbles with some super cute ideas, so stop over and check it out :)

This is what they looked like before I painted them.


I decided that I wanted to go with orange as the base color so I painted the entire  frame


Then taped it off with painters tape and used the same instructions for the perfectly straight lines as I used in my Picture Frame Tutorial.  I chose white for the outsides, then blue, then green...  I will mention this wasn't a "quick" project.  Since I had to let each color completely dry before I put the painters tape on for the stripes.


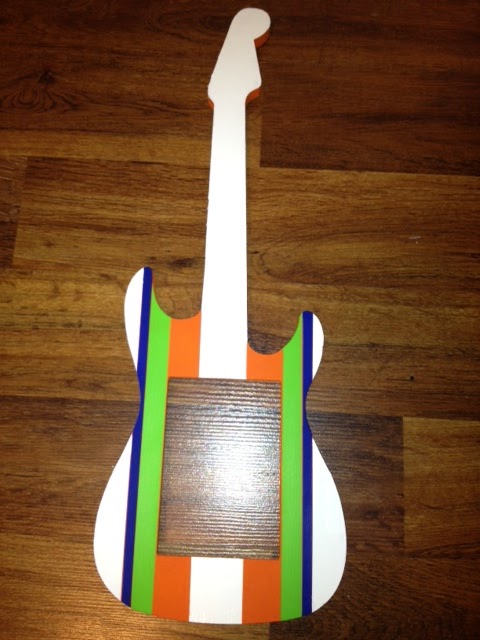
This is what it looked like after the outside stripes were complete.


At this point I did another white stripe down the middle, but didnt paint the sides (so they are still orange).


I still thought it needed something so I pulled out some of my nail head upholstery trim and nailed those into the top for a much needed "real guitar look".


I think that part turned out super cute!  Then I used my Silhouette to cut a stencil out of vinyl for the names and painted them blue.  I love the finished product and think they will too!!


I'm linking up to these great parties...


Featured


The Carnival Party that I planned for my daughter's birthday was featured on I Heart Naptime today!!  So exciting!! 

Stop by and check out her blog........  AWESOME!

Sunday, April 22, 2012

Featured!


I was so excited to find out that my Gallery Wall Grouping was featured at 5 AWESOME blogs this week!!!
 
Two Sasters , Lolly Jane ,  Randee's Organized Chaos  , The Winthrop Chronicles , and House of Hepworths

Stop by and check them out!!  They always have the cutest things :)

Carnival Birthday Party


Last year for my daughter's birthday, I decided I wanted to do the "Carnival Theme"..  So, after lots of planning it was finally time to put all of the ideas together.  And let me tell you, it was such a fun time!!  At the same time, after it was over I was exhausted.  So much so that, this year I decided I would just take her somewhere super fun and have a small "family" party. 

I will say though that everyone had a blast!  There are lots of pictures so be prepared.

For the tables I purchased table clothes, runners, and chair ties from Table Cloths Factory.  They have a wonderful selection and have most any color you would want.  Their prices can't be beat....  and believe me I looked!  So, I highly recommend them!

I also purchased bubble gum machines from the Dollar Tree.  There is one very close to me so I stopped by there often as I was preparing, since everything in the store is a dollar.  I felt like I hit the jackpot when I found these!!  And bought all that they had since we were having about 20 kids.  I also lucked up on the big clown bow ties and huge sunglasses there too!


I found the hotdog steamer at a vintage store and found the hamburger baskets at Target in the dollar bin section!


My daughter LOVES animals so I thought getting a petting zoo would be a great birthday surprise for her.  She loved it as much as I knew she would.  Honestly, that was the only thing most of the kids there were concerned with....  They all loved the animals and the pony rides.  This petting zoo was awesome.  The came with all the animals, had little fences that they set up and provided the food so the kids could feed the animals!  Looking back I could have easily omitted the games. 


My dad had the best time with the cotton candy machine!  When I was planning, I was thinking of cutting it out and he insisted that I have it....  Actually, his words were, "What is a carnival without a cotton candy machine and popcorn machine?".  He was right :) 


We also had a photo booth that was so much fun!! 


Even though the wind almost blew away the tent......um 3 or 4 times, this was a lot of fun to plan. Plus, seeing the smiles on all the kids faces was priceless!  I hope that it helped make some great memories for my sweet little girl.


I'm Linking up to the great Parties:


The Southern Institute

Saturday, April 14, 2012

Gallery Wall


I have had several requests for a post on my Gallery Wall Grouping from the  DIY Pallet Canvas post....  It's great to find out that so many people love it as much as I do :)

I purchased all of the unfinshed wood whimsical frames from Cut It out Already Frames and I have to say they have amazing customer service.  I do not live close to the store so they had to ship the frames to me.  Anytime that I called to check on the order I was actually able to speak with a live person, not just a recording.  They have so many frames to choose from.  Below are the ones that I chose.


The ones that aren't framed came from I Print Canvas.  Once again superb customer service.  I enjoy buying from small business owners as customer service is almost always top priority with them.  Plus, it seems I get a better product.  I Print Canvas offers so many different print options. 
The large picture is a 12x18, then the other two pictures are size 8x12.

I also purchased a 16x20 from Cut it Out Already Frames and found this adorable poster from Signs by Andrea.  Together these two look awesome!!!


Once again, all of the pictures taken above were taken by my mother at Tena Wood Photography

I hope I have answered all of the questions but if not please feel free to contact me!

I'm Linking up to these awesome parties:

Serenity Now - Weekend Bloggy Reading
Kojo-Designs Friday Fun Finds
Heatherly Loves - Sunday Round Up
Lolley Jane - Weekend Link Party
Bubbly Nature Creations - Weekend Link Up
Southern Institute - Creative me
The Girl Creative - Just Something I Whipped Up
Coastal Charm - Nifty Thrifty Tuesday
Two Sasters - TGIF
Sisters of the Wild West - Sister Sunday Link Party
Tatertots and Jello - Weekend Wrap Up
I Heart Naptime - Sundae Scoop Link Party
Adventures of a DIY Mom - Terrific Tuesday
Cheap Crafty Mama - Pin It Win It Link Party
The Winthrop Chronicle - Share It Link Party


Tip Junkie handmade projects

The DIY Dreamer


Pincushion Creations


HookingupwithHoH

Featured!!


I have been overwelmed by the response on this project and am so glad that you all are enjoying this as much as I did making it!

It has been featured on 4 awesome blogs this week.... 

Craftionary,  Bubbly Nature Creations,  Craft-O-Maniac, and I Heart Naptime

If you haven't visited them, please do so......  They have some awesome projects featured.

Wednesday, April 11, 2012

Blessed


This week we are celebrating my sweet girl's 5th birthday!!  I feel totally and completely blessed to have her as my daughter.  She has changed my life in every way possible for the better and I am so thankful to be the person she calls "Mama". 
Hope that you all have a wonderful day!!

Friday, April 6, 2012

DIY Pallet Canvas

Recently, in the past few months I've joined the wonderful world of  Pinterest and you can follow me HERE.....  Needless to say, I have found way too many things that I want to make!  I saw this DIY Mini Pallet tutorial from U Create Crafts, which just so happens to be a blog that I check out often.  I also fell in love with this from Corner House Blog but my house is way to small for something that size! 

Anyway, one day while browsing at Michaels Craft, I ran across some Balsa Wood and it hit me!  I could use this for a smaller pallet project because it is SO thin!  Kari at U Create Crafts used jumbo popsicle sticks for her project (which is genius) but I wanted something a little bit bigger and didn't want to cut a ton of them.  So, I picked this up...  It was $1.79 for a 36 inch piece. 

I already had an 11x14 canvas so this is the size I chose to use.  I ended up using 1 and a half pieces of the Balsa Wood. 


See how thin it is!!!  (Fun Fact: My dad actually informed me that a lot of people use this to build model airplanes....) 


At this point, I put the wood up to the canvas and guesstimated where it needed to be cut.  I cut it with sissors and then broke the piece in half, to give it the "pallet" look. 


I did this until I had enough to cover the canvas...  Then painted all of them with white acrylic paint (not as thick as I normally would, since I wanted a "worn" look).  At that point, I used my trusty glue gun and glued all of them in place.  Then used the same stencil technique as I used in my DIY Quote Board by cutting it out with my Silhouette.  The colors I chose were gray and pink since I wanted to put it on my living room wall with pictures of my sweet girl. 


I love it!!!  And think it looks great with the pictures (which my mom at Tena Wood Photography took).  The turquoise headband my daughter has on is from Miss Ruby Sue.  The whimsical frames are from Cut It Out Already Frames and the ones that aren't framed are from I Print Canvas and are mounted on the 3/16 Gator Board. 

Hope you enjoy this as much as I love looking at it!! :)

I'm Linking up to these fabulous parties


Design Dazzle
Weekend Bloggy Reading

Decorating Insanity


The DIY Dreamer


I Heart Nap Time


Pincushion Creations
The Southern Institute